Thursday, March 8, 2012

A small Tutorial on HTML5 Server Sent Events(SSE) Part-I


When communicating using SSEs, a server can push data to your app whenever it wants, without the need to make an initial request. Updates can be streamed from server to client as they happen. SSEs open a single unidirectional HTTP channel between server and client.

1) To subscribe to an event stream, create an EventSource object and pass it the URL of your stream:

if(!window.EventSource){
 var source =newEventSource('stream.php');
}else{
 // Result to xhr polling :( xhttprequest
}

Note: If the URL passed to the EventSource constructor is an absolute URL, its origin (scheme, domain, port) must match that of the calling page.

2) Next, set up a handler for the message event. You can optionally listen for open and error:

source.addEventListener('message',function(event){
 console.log(event.data);
},false);


source.addEventListener('open',function(event){
 // Connection was opened.
},false);

source.addEventListener('error',function(event){
 if(e.readyState ==EventSource.CLOSED){
   // Connection was closed.
 }
},false);

3) When updates are pushed from the server, the onmessage handler fires and new data is be available in its event.data property. The magical part is that whenever the connection is closed, the browser will automatically reconnect to the source after ~3 seconds. Your server implementation can even have control over this reconnection timeout.
That's it. Your client is now ready to process events from stream.php.

Event Stream Format:

For sending an event stream from the source on server
  • Construct a plaintext response (HTTP 200 OK), served with Content-Type:text/event-stream.
  • The response should be of this format
data:My message\n\n
  • You can send a unique id with an stream event by including a line starting with "id:":
id:12345\n
data: GOOG\n
data:556\n\n
  • Setting an ID lets the browser keep track of the last event fired so that if, the connection to the server is dropped, a special HTTP header (Last-Event-ID) is set with the new request. This lets the browser determine which event is appropriate to fire. The message event contains a event.lastEventId property.
  • Set the timeout by including "retry:", followed by the number of milliseconds to wait before trying to reconnect (default is 3 secs)
retry:10000\n
data: hello world\n\n
  • If "event:" is present, followed by a unique name for the event, the event is associated with that name. On the client, an event listener can be setup to listen to that particular event. For example, the following server output sends three types of events, a generic 'message' event, 'userlogon', and 'update' event:
data:{"msg":"First message"}\n\n
event: userlogon\n
data:{"username":"John123"}\n\n
event: update\n
data:{"username":"John123","emotion":"happy"}\n\n


With event listeners setup on the client Browser :
source.addEventListener('message',function(e){
 var data = JSON.parse(e.data);
 console.log(data.msg);
},false);

source.addEventListener('userlogon',function(e){
 var data = JSON.parse(e.data);
 console.log('User login:'+ data.username);
},false);

Cancel an Event Stream (avoid reconnection):
  • To cancel a stream from the client simply call:
source.close();
  • To cancel a stream from the server, respond with a non "text/event-stream" Content-Type or return an HTTP status other than 200 OK (e.g. 404 Not Found).
SSE support in Desktop Browsers:
Web Browser
Support?
Information
Internet ExplorerNone
Mozilla FirefoxYesStarting with Firefox v6.0
Google ChromeYes
OperaYesStarting with Opera v11
SafariYesStarting with Safari v5.0

The above table was referred from http://en.wikipedia.org/wiki/Server-sent_events


SSE support in Hand Held devices (Browsers):


Test the functionality of SSE with Apache WAMP server:

Implementation:
The implementation has been done by using perl, html and java scripts.

Requirements:

  1. Apache Server which supports perl, php etc.,
  2. Browser that supports HTML5.
Installation:
  1. Apache WAMP Server 2.2 has been used here. Just download and install it from www.wampserver.com
  2. Active Perl software is needed. Just download and install it from www.activestate.com
Configuring Perl on WAMP:
  1. Click on the WAMP system tray apache>httpd.conf. The file will open in a text editor.
  2. Search for “Options Indexes FollowSymLinks ” and replace it with “Options Indexes FollowSymLinks Includes ExecCGI “
  3. Search for “#AddHandler cgi-script .cgi” and replace it with “AddHandler cgi-script .cgi
AddHandler cgi-script .pl “
  1. Search for “DirectoryIndex index.php index.php3 index.html index.htm” and replace it with “DirectoryIndex index.php index.php3 index.html index.htm index.cgi index.pl
  2. Now WAMP is configured to run perl scripts.
  3. Click on WAMP system tray and click on start all services. The system tray should glow green in color.
  4. Keep your .cgi or .pl files in the path “C:\wamp\bin\apache\Apache2.2.11\cgi-bin\” and to run the scripts open the browser and type this url :http://localhost/cgi-bin/  followed by your program name
For more information regarding installtion and configuring WAMP and Active Perl, Please refer the following blog post : 
http://shravanthimohan.wordpress.com/2011/11/26/configuring-perl-on-wamp/

Example 1: (using CGI script)

1. Consider the following perl script “ticker.cgi”
#!c:/perl/bin/perl
print "Content-Type: text/event-stream\n\n";
while(true){
  print "event: server-time\n";
  $time = localtime();
  print "data: $time\n\n";
}
Save it in “C:\wamp\bin\apache\Apache2.2.11\cgi-bin\”

2. Consider the following html with javascript. “testcgi.html”
<!DOCTYPE HTML>
<html>
<head>
<script type="text/javascript">
function invokeSSE(){

var source = new EventSource('http://localhost:80/cgi-bin/ticker.cgi');
source.addEventListener('server-time', function(e) {
document.getElementById('ticker').innerHTML = e.data + '<br>';
}, false);


source.addEventListener('open', function(e) {
//Connection Open
}, false);
source.addEventListener('error', function(e) {
if (e.readyState == EventSource.CLOSED) {
alert("Connection closed");
}
}, false);
}
</script>
</head>
<body onload="invokeSSE()">
<div id="ticker" name="ticker">
  [TIME]
</div>
</body>
</html>
Save the file in “C:\wamp\www”

3. Open the browser and type the URL as http://localhost/testcgi.html and you should be able to view the system time ticking.

Example 2: (With 2 events)

1. Consider a perl script “sendImage.cgi”
#!c:/perl/bin/perl
use CGI qw(:standard);
my $cgi = CGI;
my $apple = "apple.jpg";
my $android = "android.jpg";
my $image = $cgi->param("image");
print "Content-Type: text/event-stream\n\n";
print "event: image\n";
if($image == $apple){

$img = $android;
}
else

$img = $apple;
print "data: $img\n\n";
sleep(3);
print "event: refresh\n";
print "data: location.reload()\n\n";
sleep(2);

Save it in “C:\wamp\bin\apache\Apache2.2.11\cgi-bin\”

2. Consider a html code with javascript “client.html”. This page has many images. But one image changes due to server sent event.
<html>
<head>
<title>CLient Page</title>
<script type="text/javascript">

function invokeSSE(){
var img = document.getElementById('dynamic').getElementsByTagName('img')[0].getAttribute('src');
source.addEventListener('image', function(e) {
var data=e.data;
document.getElementById('dynamic').getElementsByTagName('img')[0].setAttribute('src',data);
}, false);
 
source.addEventListener('refresh', function(e) {
setTimeout(e.data,3000);
}, false);


source.addEventListener('open', function(e) {
//Connection Open
}, false);

source.addEventListener('error', function(e) {
if (e.readyState == EventSource.CLOSED) {
alert("Connection closed");
}
}, false);
}
</script>
</head>
<body onload="invokeSSE()">
<center>
<table>

<tr>
<td id="dynamic"><img src="apple.jpg" height=200 width=200/></td>
<td><img src="google.jpg"/></td>
<td><img src="linked.jpg"/></td>
</tr>
<tr>
<td><img src="micro.jpg"/></td>
<td><img src="sony.jpg"/></td>
<td><img src="xerox.jpg"/></td>
</tr>
</table>
</center>
</body>
</html>
Save the file in “C:\wamp\www\SSEClient”

3. Open the browser and type the URL as http://localhost/SSEClient/client.html and you should be able to view a page with few images. One image changes on server sent event.
Initially:

:
Later: (After few seconds)

Friday, February 10, 2012

In & Out of Apple's Macintosh....


A little bit of history.....

The Macintosh project started in early 1979 with Jef Raskin, who envisioned an easy-to-use, low-cost computer for the average consumer. In September 1979, Raskin began looking for an engineer who could put together a prototype. Bill Atkinson, a member of the Apple Lisa team, introduced him to Burrell Smith, a service technician who had been hired earlier that year.

In January 1981Steve Jobs completely took over the Macintosh project. Jobs and a number of Apple engineers visited Xerox PARC in December 1979, three months after the Lisa and Macintosh projects had begun. After hearing about the pioneering GUI technology being developed at Xerox PARC from former Xerox employees like Raskin, Jobs negotiated a visit to see the Xerox Alto computer and Smalltalk development tools in exchange for Apple stock options. The final Lisa and Macintosh operating systems mostly used concepts from the Xerox Alto, but many elements of the graphical user interface were created by Apple including the menubar, pop-up menus and the concepts of drag and drop and direct manipulation.

Here comes a small sneak peek video on Apple....!!!


This video mainly focuses on the good and bad of the Mac operating system. It also includes it's so called "rival", Windows.

Now finally their products. You might be thinking of the ipads, iphones , ipods etc., Yes here they are. But have a look at computers from ages. This seems interesting. Here it goes. :)


Sad news: The great Steve Jobs is no more. :(

Apple has always been rocking all the time with their unusual products when compared to other computer developing companies like Microsoft and IBM. Wish that in future Apple would do much better. :). 

Tuesday, January 17, 2012

Java Servlet Filters

1. History
Servlet Filters are the latest components that are added in Servlet 2.3 specifications. These filters are used basically for intercepting and modifying requests and response from server.


2. Pre-requisites
We will be using 3 things here.

  1. JDK 1.6
  2. Tomcat 6
  3. Eclipse (galileo or helios)
3. Usage
The usage is very simple. This is a very basic and simple way of demonstrating the use of Java filters. First create a dynamic web project in eclipse. Then create a directory structure as shown:

As it can seen that, under "Java Resources", 
  1. A package named "com.zinnia.filter" has been created.
  2. Under that package a java class named "MyFilter.java" has been created.
Inside the "WebContent" directory, 
  • An HTML file named "index.html" has been created. 

1. Java Class:

//MyFilter.java


2. HTML file(index.html)


3. Deployment descriptor:(web.xml)


4. Testing the filter:

Just right click on index.html page, hover the mouse on "Rus As", then click on "Run on Server".
  1. You must be able to view your index.html page on the browser. URL here is "http://localhost:8080/FilterExample/index.html".
  2. Next, navigate to the page "http://localhost:8080/FilterExample/index.html?redirectme=abc". This time the filter catches the "redirectme" using getParameterValues and redirect the browser to "http://www.google.com".
Try out different possibilities of using filters. In my view, this is one of the powerful tool or way to redirect url requests. Enjoy using Java Filters!!!!!..

Friday, September 23, 2011

W3Schools - Helpful for all web programmers


As everybody knows, web is something where people look for information. Well if you want to become a good web programmer, get started by referring to W3Schools. 


This is the best and a simple online web tutorial site, using which you would probably be able to design a good web User Interface. For beginners its a good site to start with. Simple presentation and precise explanation is given here. Not only for beginners, but also useful for any web programmer to design good web User interface.


It mainly deals with web tutorial on HTML 4.01, HTML 4, XML DOM, Javascript, HTML DOM, jQuery, SQL, CSS 1,2,3, PHP, XSLT, XPath, XSL-Fo, Color-Picker, HTML Color, CSS3 Browser Support. 


Just click "W3Schools" for more information.

Sunday, September 4, 2011

Commons-Logging Tutorial

1. Introduction

The Apache Commons Logging (JCL) provides a Log interface that is intended to be both light-weight and independent of numerous logging toolkits. It provides the middleware/tooling developer a simple logging abstraction, that allows the user (application developer) to plug in a specific logging implementation.

The Apache Commons Logging provides a Log interface with thin-wrapper implementations for other logging tools, including Log4J, Avalon LogKit, and JDK 1.4. The interface maps closely to Log4J and LogKit.

2. Configuration:

There are two base abstractions used by Commons-Logging: Log (the basic logger) and LogFactory (which knows how to create Log instances). UsingLogFactory implementations other than the default is a subject for advanced users only, so let's concentrate on configuring the default implementation.
The default LogFactory implementation uses the following discovery process to determine what type of Log implementation it should use (the process terminates when the first positive match - in order - is found):

  1. Look for a configuration attribute of this factory named org.apache.commons.logging.Log (for backwards compatibility to pre-1.0 versions of this API, an attribute org.apache.commons.logging.log is also consulted).
  2. Look for a system property named org.apache.commons.logging.Log (for backwards compatibility to pre-1.0 versions of this API, a system propertyorg.apache.commons.logging.log is also consulted).
  3. If the Log4J logging system is available in the application class path, use the corresponding wrapper class (Log4JLogger).
  4. If the application is executing on a JDK 1.4 system, use the corresponding wrapper class (Jdk14Logger).
  5. Fall back to the default simple logging wrapper (SimpleLog).

3. Developing:

To make use of Commons-Logging,include the following import statements:
import org.apache.commons.logging.Log; import org.apache.commons.logging.LogFactory;
Note that some components using commons-logging may either extend Log, or provide a component-specific LogFactory implementation. Review the component documentation for guidelines on how commons-logging should be used in such components.
For each class definition, declare and initialize a log attribute as follows:

public class CLASS {    
private static Log log = LogFactory.getLog(CLASS.class);    ...  

Messages are logged to a logger, such as log by invoking a method corresponding to priority. The org.apache.commons.logging.Log interface defines the following methods for use in writing log/trace messages to the log:
log.fatal(Object message);
log.fatal(Object message, Throwable t);
log.error(Object message);
log.error(Object message, Throwable t);
log.warn(Object message);
log.warn(Object message, Throwable t);
log.info(Object message);
log.info(Object message, Throwable t);
log.debug(Object message);
log.debug(Object message, Throwable t);
log.trace(Object message);
log.trace(Object message, Throwable t);

Semantics for these methods are such that it is expected that the severity, from highest to lowest, of messages is ordered as above.
In addition to the logging methods, the following are provided for code guards:
log.isFatalEnabled(); 
log.isErrorEnabled(); 
log.isWarnEnabled(); 
log.isInfoEnabled(); 
log.isDebugEnabled(); 
log.isTraceEnabled();

General - Message Priorities/Levels

It is important to ensure that log message are appropriate in content and severity. The following guidelines are suggested:
  • fatal - Severe errors that cause premature termination. Expect these to be immediately visible on a status console. See also Internationalization.
  • error - Other runtime errors or unexpected conditions. Expect these to be immediately visible on a status console. See also Internationalization.
  • warn - Use of deprecated APIs, poor use of API, 'almost' errors, other runtime situations that are undesirable or unexpected, but not necessarily "wrong". Expect these to be immediately visible on a status console. See also Internationalization.
  • info - Interesting runtime events (startup/shutdown). Expect these to be immediately visible on a console, so be conservative and keep to a minimum. See also Internationalization.
  • debug - detailed information on flow of through the system. Expect these to be written to logs only.
  • trace - more detailed information. Expect these to be written to logs only.

4. Integration:

The minimum requirement to integrate with another logger is to provide an implementation of the org.apache.commons.logging.Log interface. In addition, an implementation of the org.apache.commons.logging.LogFactory interface can be provided to meet specific requirements for connecting to, or instantiating, a logger.

  • org.apache.commons.logging.Log

  • The default LogFactory provided by JCL can be configured to instantiate a specific implementation of the org.apache.commons.logging.Log interface by setting the property of the same name (org.apache.commons.logging.Log). This property can be specified as a system property, or in the commons-logging.properties file, which must exist in the CLASSPATH.
  • Default logger if not plugged

  • The Apache Commons Logging SPI uses the implementation of the org.apache.commons.logging.Log interface specified by the system propertyorg.apache.commons.logging.Log. If the property is not specified or the class is not available then the JCL provides access to a default logging toolkit by searching the CLASSPATH for the following toolkits, in order of preference:
    • Log4J
    • JDK 1.4
    • JCL SimpleLog
  • org.apache.commons.logging.LogFactory

If desired, the default implementation of the org.apache.commons.logging.LogFactory interface can be overridden, allowing the JDK 1.3 Service Provider discovery process to locate and create a LogFactory specific to the needs of the application. Review the Javadoc for the LogFactoryImpl.java for details.

5. Configuring logger implementation:

As Log4J is the default logger, a few details are presented herein to get the developer/integrator going.Configure Log4J using system properties and/or a properties file:

  • log4j.configuration=log4j.properties
  • Use this system property to specify the name of a Log4J configuration file. If not specified, the default configuration file is log4j.properties.  
  • log4j.rootCategory=priority [, appender]*
  • Set the default (root) logger priority.  
  • log4j.logger.logger.name=priority
  • Set the priority for the named logger and all loggers hierarchically lower than, or below, the named logger. logger.name corresponds to the parameter of LogFactory.getLog(logger.name), used to create the logger instance. Priorities are: DEBUG, INFO, WARN, ERROR, or FATAL.Log4J understands hierarchical names, enabling control by package or high-level qualifiers: log4j.logger.org.apache.component=DEBUG will enable debug messages for all classes in both org.apache.component and org.apache.component.sub. Likewise, setting log4j.logger.org.apache.component=DEBUG will enable debug message for all 'component' classes, but not for other Jakarta projects.
  • log4j.appender.appender.Threshold=priority
Log4J appenders correspond to different output devices: console, files, sockets, and others. If appender's threshold is less than or equal to the message priority then the message is written by that appender. This allows different levels of detail to be appear at different log destinations.For example: one can capture DEBUG (and higher) level information in a logfile, while limiting console output to INFO (and higher).

6. Examples:

As it was explained in my previous blog post Log4j Tutorial, we'll use the same sample examples here to commons-logging work.

First download the, commons-logging-1.1.1-bin.zip
by clicking on the above link.

Keep the commons-logging jar in the classpath. I'll be using eclipse builder to try out the examples.

Example 1:

My example code for demonstrating commons logging is Try1.java. It is as shown.


Maintain the directory structure as shown, provided commons-logging and log4j jars are in the classpath.


The contents in the "commons-logging.properties" must be as follows.


The contents in the "log4j.properties" must be as follows.


The output will be as shown.


Example 2:

Now using "log4j.xml"

The content of code is almost the same. But we must specify the log4j configuration file as log4j.xml instead of log4j.properties. The log4j.xml is as shown.


The output will be the same as previous example.

NOTE: By default, the commons-logging jars(if they are in the classpath) look for the default logging being used. Suppose log4j jars are in classpath, then by default it'll set the log4j.configuration as log4j.properties or log4j.xml ( In other words, it;ll look for those two files). So if we have both log4j and commons-logging jars in classpath it is not mandatory to use the "commons-logging.properties" file. This scenario is taken up in the next example.

Example 3:

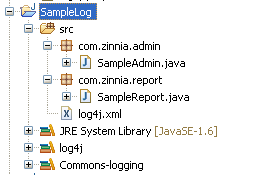
  1. Create a Project name "SampleLog" in eclipse.
  2. Create two packages. One is named as "com.zinnia.admin" & the other one is named as "com.zinnia.report".
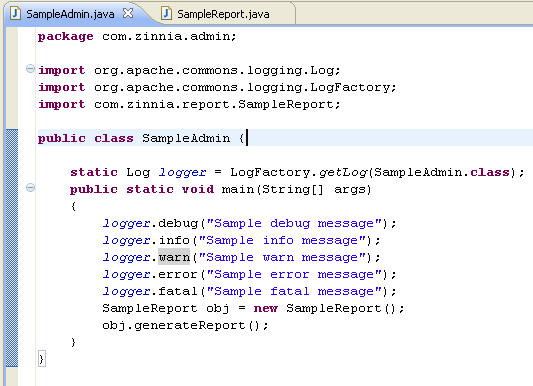
  3. Create two java classes "SampleAdmin.java" & "SampleReport.java", each in one of the packages. The directory structure and the java class placement is as shown.
  4. We can see that log4j and commons-logging libraries are in the classpath along with log4j.xml. Also here there is no commons-logging.properties file. The code for SampleAdmin.java  & SampleReport.java is given below.


The log4j.xml is as follows.


Now when we run the "SampleAdmin.java" class, a directory named "logs" gets created. There will be 2 files inside this directory namely admin.log & report.log .


The contents in "admin.log" and "report.log" is as follows.


It can be concluded that commons-logging is just a wrapper over all different types of loggers like log4j, simplelog or default java logs etc.

For more information on Log4j and different functionalities used in this post like console appenders and file appenders can be referred in Log4j Tutorial .